Easy Origami Twisty Rose (Omuta Rose)
Easy Origami Twisty Rose Step 1: Start by folding the origami waterbomb base. This is a commonly used base in origami and we've created a separate page of instructions for it.
Or you can follow the video instructions below. Origami Waterbomb Base
You should then have the following to start with.

Easy Origami Twisty Rose Step 2: Fold both the left and right tips to the top, upper layer only.


Easy Origami Twisty Rose Step 3: Fold both tips down to the bottom. Crease well and unfold.


Easy Origami Twisty Rose Step 4: Now pry paper open. We're going to make a squash fold by pressing the paper flat to make a square shape.


Repeat the squash fold for the left side.

Easy Origami Twisty Rose Step 5: Flip paper over.
Repeat Steps 2 to 4 on this side.


Easy Origami Twisty Rose Step 6: Make 2 diagonal folds for the upper layer.


Easy Origami Twisty Rose Step 7: Flip paper over.
We're going to repeat the diagonal folds on Step 6 on this side.


Easy Origami Twisty Rose Step 8: Make a horizontal valley fold where indicated below. Crease well and unfold.


Easy Origami Twisty Rose Step 9: Now fold back the bottom layers.


Easy Origami Twisty Rose Step 10: Use your finger to pry the paper open on both sides as shown by the arrows below.


Make a squash fold on each side by pressing the paper flat to form a triangle shape.


Easy Origami Twisty Rose Step 11: Flip paper over.

Easy Origami Twisty Rose Step 12: Lift up the bottom "triangle".


Easy Origami Twisty Rose Step 13: Make a diagonal fold as shown below. Note that we're folding the upper layer only.


Easy Origami Twisty Rose Step 14: Rotate paper 180 degrees.

Easy Origami Twisty Rose Step 15: Make a diagonal fold again like we did in Step 13.


Easy Origami Twisty Rose Step 16: Here comes the fun part! Watch the video to see how you can twist and shape this paper into a pretty origami rose!
Easy Origami Twisty Rose Video
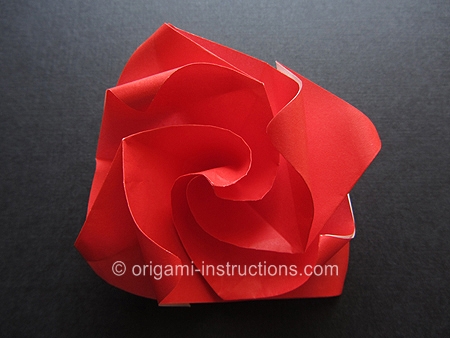
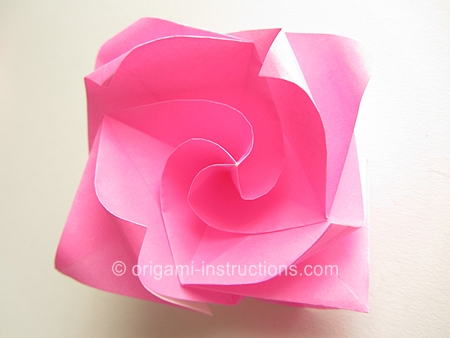
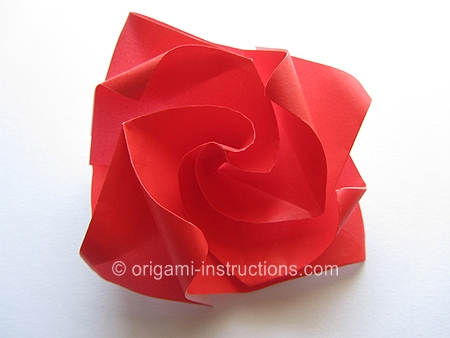
And your easy origami twisty rose is complete!
And here's a red twisty rose...
Here's the red rose on a dark background...